Step Section: Generate a Roster Auction Example
Prerequisites:
- Custom Roster View - A custom view of the Roster is needed when targeting specific types of vacancies. If you are targeting all vacancies, the default <vacancies> view will suffice.
- Bidders List Plan - A list plan is required to create the list of bidders. Required for both Queue and Preference auctions.
- Win Order List Plan - A list plan is required to process the win order for all Preference type auctions.
- Optional - Formula IDs maybe needed to change the default position names.
- See Generate Field Descriptions topic for field definitions.
To configure a basic Roster type auction:
- Go t o Setup > Bidding > Auction
- Click Add to create a new auction.
- In the Auction screen, configure these fields:
- Name the auction.
- Enter the Effective Date.
- Select the Bidders List Plan from the Bidders drop-down.
- Select the Win Order List Plan from the Win Order drop-down if this is a Preference auction. Skip this option for a Queue auction unless instructed to select by an application expert.
- Select Queue or Preference from the Bid Method drop-down.
- Click Save.
- Go to the left panel of the Auction, and click Add
> Generate items...
The Generate Items properties window shows. The screen shows only the required fields for the selected items.
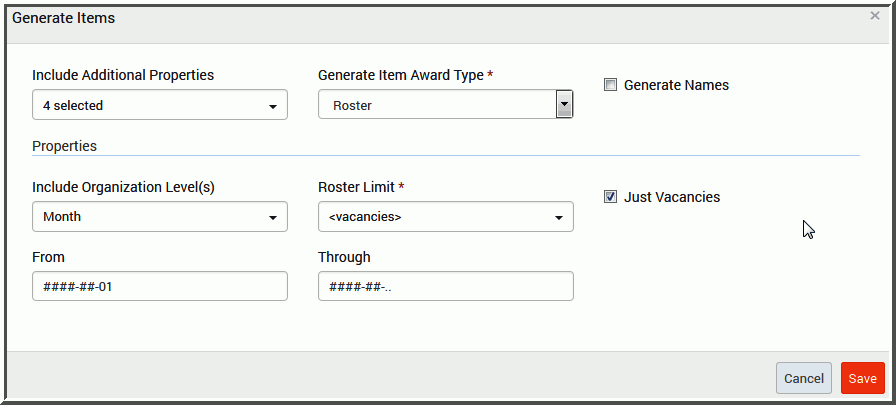
- To start a basic roster auction, select the Award Type:Roster. A red asterisk next to the field name denotes a required field.
- Roster base settings are:
- Select Month from the Include Organization Levels drop-down.
- Enter the start date in From and the end date in Through to return
vacancies for the date range indicated.
IMPORTANT The Roster auction will show vacancies within the date range indicated in the From and Through fields at this moment in time. The Auction will not automatically update the auction item tree and auto magically create new auction items should additional vacancies exist after the Auction has been generated. To update the auction tree with new vacancies, generate a new auction to return and show the new vacancies. - Select the roster view from the Roster Limit drop-down to return vacancies limited to this view and filters within. For this task select the default view <vacancies>
- Select Just vacancies to limit the auction item generation to only vacant positions. Select the check box if the Roster view selected in Roster Limit contains a mix of vacancies and positions.
- Click Save.
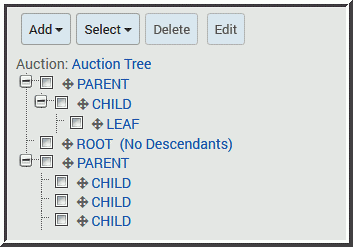
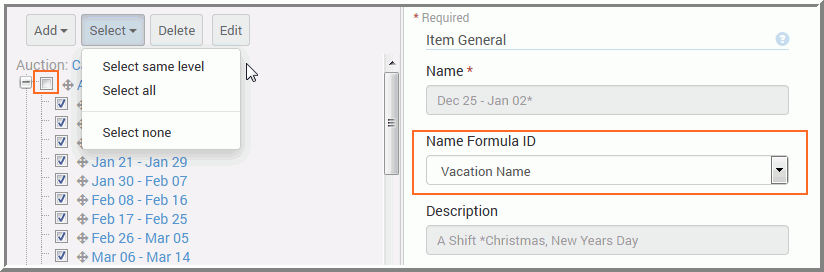
- Go to Select > Select All same level to select
only Child items. Doing so will exclude the Parent level
from the Formula ID.
- Select the desired Formula ID from the Formula ID drop-down.
- Click Save to resolve the Formula IDs. The auction items will display the new name.
- Select Is Visble in Visible Condition.
- Click Save.
- Select a Child, or an auction item and then click Select > Select all same level to select all applicable auction items.
- Select Is Biddable in Biddable Condition.
- Click Add to create a new plan.
- Label the Plan. Assign this auction to the selected Bidding Plan. Doing so will make this auction available in the Bidding area.
- Click Save.
Step Section: To apply a Formula ID and change the position
names, go to the Auction Items list and select one of the
auction items.
Step Section:
Step Section: To control the visibility of this Auction, go to the Parent level
of the auction tree.
Step Section: To control which items are biddable for this Auction,
go to the Child level in the auction tree.
Step Section: To apply the Bidding Plan and make this Auction
available in the Manage Bidding area, go to Setup > Bidding
> Plan.