Sample Shift Trade Configurations

Sample configurations for...
  • One-Way Shift Trade work code
  • Two-Way Shift Trade Work Codes
  • Shift Trade Work Code with an Overlap Threshold
  • Reverse One-Way Shift Trade Work Code
  • Trade related static issues...

One-Way Shift Trade

Prior Work Code knowledge is required to set this task. Review Work Code Cover Field Descriptions topic for field definitions.

Note:

Additional settings may be required to produce the desired output. Contact a Kronos application expert for assistance if needed.

This is a sample configuration for a One-Way Shift Trade work code:

  1. Go to Setup > Codes > Work Codes.
  2. Click Add to create the working half of the Shift Trade work code. Enter a Name, an Abbreviation, and choose a color for this work code.
  3. Select Working in Type. Keep the default settings as is. Additional or less settings may be required to produce the desired output.
  4. Select Only as a Cover for the Authority roles that should have access to this work code.
  5. Click Save. Click Return to List to navigate back to the list of work codes.
  6. Click Add to create a second work code, this is the non-working half of the shift trade work code. Enter a name, an abbreviation, and select a color.
  7. Select Non-Working in Type. Keep the default settings as is. Additional or less settings may be required to produce the desired output.
  8. In Cover...
    1. Select the shift trade working type code created in step 2.
    2. Select Anyone in Assignment Requirement for this sample configuration.
    3. Select the Required check box.
  9. Select Yes for the Authority roles that should have access to this work code.
  10. Click Save.

Two-Way Shift Trade

Prior Work Code knowledge is required to set this task. Review Work Code Cover Field Descriptions topic for field definitions.

Note:

Additional settings may be required to produce the desired output. Contact a Kronos application expert for assistance if needed.

This is a sample configuration for a Two-Way Shift Trade work code:

  1. Go to Setup > Codes > Work Codes.
  2. Click Add to create the working half of the Shift Trade work code. Enter a Name, an Abbreviation, and choose a color for this work code.
  3. Select Working in Type. Keep the default settings as is. Additional or less settings may be required to produce the desired output.
  4. Select Only as a Cover for the Authority roles that should have access to this work code.
  5. Click Save. Click Return to List to navigate back to the list of work codes.
  6. Click Add to create a second work code, this is the non-working half of the shift trade work code. Enter a name, an abbreviation, and select a color.
  7. Select Non-Working in Type. Keep the default settings as is. Additional or less settings may be required to produce the desired output.
  8. In Cover...
    1. Select the shift trade working type code created in step 2.
    2. Select Anyone in Assignment Requirement for this sample configuration.
    3. Select the Required check box.
    4. Select Two way trade required in Trade Mode.
    5. Select a period to restrict the user to a pay back period in Trade Period Restrictions. Default is None. For this sample configuration use None to start, see the results and work flow of a two way trade then tighten the two way trade with a period restriction if desired.
  9. Select Yes for the Authority roles that should have access to this work code.
  10. Click Save.

Shift Trade with an Overlap Threshold

Work Code knowledge is required to set this task.
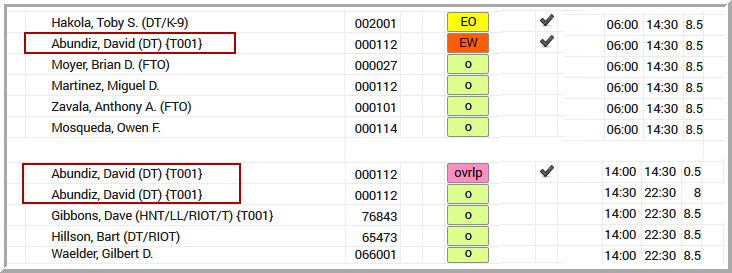
The overlap work code is set on the non-working code. The overlap code behavior follows the working half of the shift trade transaction. On the Roster, the overlap code shows next to the overlap threshold it is covering, as shown in the image below:

This is a samplecConfiguration for a One-Way Shift Trade work code using an Overlap Code:

  1. Go to Setup > Codes > Work Codes.
  2. Click Add to create the overlap work code. Enter a name, an abbreviation, and select a color. For example, Overlap (ov).
  3. REQUIRED: Select Non-Working in Type. Select But Still Available in Properties.
  4. Click Add to create the working half of the shift trade work code. Enter a name, an abbreviation, and select a color. For example, Exchange Working (EW).
  5. Select Working in Type. Keep the default Properties as is. Additional or less settings may be required to produce the desired output.
  6. Select Only as a Cover for the Authority roles that should have access to this work code.
  7. Click Save.
  8. Click Add to create the non-working half of the shift trade work code. Enter a name, an abbreviation, and select a color. For example, Exchange Off (EO).
  9. Select Non-Working in Type. Keep the default Properties as is. Additional or less settings may be required to produce the desired output.
  10. In Cover:
    1. Select the shift trade working type code previously created. For example, Exchange Working.
    2. In Assignment Requirement, select the desired constraint. For example, choosing Same Assigned Agency allows the working code to be placed on any person assigned to work in the same agency as the person entering the nonworking half of the work code. Alternatively, selecting Anyone would allow the person to trade with any qualified person regardless of where they’re assigned to work.
    3. Select the Required check box.
    4. Enter the number of minutes the shifts associated with the Exchange Working and Exchange Off codes can overlap in Overlap Threshold.
    5. Select the applicable work code to Add when an overlapping time-period exists during the overlap threshold provided. This is the overlap code created at the beginning of this task. For example, Overlap work code.
  11. Select Yes for the Authority roles that should have access to this work code.
  12. Click Save.

    Additional settings may be required to produce the desired output. Contact a Kronos application expert for assistance if needed.

Reverse One-Way Shift Trade

Prior Work Code knowledge is required to set this task.

This is a sample configuration for a Reverse One-Way Shift Trade work code implemented by some customers prior to the release of two-way shift trades:

  1. Go to Setup > Codes > Work Codes.
  2. Click Add to create the non-working half of the Shift Trade work code. Enter a Name, an Abbreviation, and select a Color.
  3. Select Non-Working in Type. Keep the remaining Behavior settings as is. Additional or less settings may be required to produce the desired output.
  4. Select Only as a Cover for the Authority roles that should have access to this work code.
  5. Click Save. Return to the list of work codes.
  6. Click Add again to create the working half of the shift trade work code. Enter a name, an abbreviation, and select a color.
  7. Select Working in Type. In Properties, select Allow Roster Location Change. Additional or less settings may be required to produce the desired output.
  8. In Cover:
    1. Select the shift trade non-working type work code previously created.
    2. In Assignment Requirement, select the desired constraint; for example, Same Assigned Agency allows the working code to be placed on any person assigned to work in the same agency as the person entering the nonworking half of the work code. Alternatively, selecting Anyone would allow the person to trade with any qualified person regardless of where they’re assigned to work.
    3. Select the Required check box.
  9. In Authority,selectYes for the Authority roles that should have access to this work code.
  10. Click Save.

    Additional settings may be required to produce the desired output. Contact a Kronos application expert for assistance if needed.

Some customers find it useful to create a Roster View with position assignment numbers displayed. Doing so allows the person initiating the trade to enter the precise location of the working half of the trade. For more information see topic: Create a Roster View with Position Numbers

Static Issues Related to Shift Trades

The following Static Issues are linked to shift trades. While most severity level defaults for static issues typically apply and fit customer needs, static issues related to trade transactions are usually modified to better fit trade policies. Static Issues are located in the Codes section of the Setup area.

  • Critical Assigned Specialties requirement not met: Appears when the Cover person does not have the same specialties of the person assigned to the position.
  • Critical assigned specialties requirement not met exactly: Appears when the Cover person has more specialties than the person initiating the trade.
  • Critical Cover specialties do not match: Appears when the Cover person does not have specialties that match the person assigned to the position.
  • Person Specialties do mot match those of the target: Appears when the Cover person does not have specialties that match position specialty requirements.
  • Two-way trade is required: Appears when two-way trade transactions are required.
  • Two-way trade durations do not match: Appears when trade durations that are required to match, do not.
  • Two-way trade period requirement not met: Appears when trade periods configured are not met.

Also See...Not in Assignment field description in Skills and Certifications Field Descriptions for additional information pertaining to person specialties and shift trades.